There are some fantastic ideas on this site. My favorite is probably how to easily get corn off the cob. Every Wednesday, I am sharing Hump Day Hacks. I hope you enjoy them
45 Amazing Kitchen Life-Hacks That Are Absolutely Genius – DIY & Crafts.

There are some fantastic ideas on this site. My favorite is probably how to easily get corn off the cob. Every Wednesday, I am sharing Hump Day Hacks. I hope you enjoy them
45 Amazing Kitchen Life-Hacks That Are Absolutely Genius – DIY & Crafts.

One of the beauties of the rotisserie chicken, is its amazing versatility. You can shred the meat and use it for quick enchiladas, chop it for salads, or make something a little more sophisticated like chicken Marsala.
If you’ve never attempted chicken Marsala, you have to try my easy recipe. Now I admit, this isn’t as good as what you’d order in a restaurant, but it’s also on the table in 15 to 20 minutes so there isn’t as much time for the flavor to infuse, but it’s still delicious. For an at-home version using rotisserie chicken, it’s pretty impressive.
I’ve been tweaking this quick Marsala for a while and am finally happy with this dish.
This week, I am focusing on the chicken’s versatility.
I have insanely easy Southwest style stuffed bell peppers. I
Quick Chicken Marsala
2 tablespoons olive oil
2 tablespoons butter
Half a large red onion
1 tablespoon flour
8 ounces sliced mushrooms
1 cup chicken stock
1 garlic clove, chopped
1/8 teaspoon dried oregano
1/8 teaspoon Italian seasoning
2 rotisserie chicken breasts
2/3 cup Marsala wine
¼ cup heavy cream
Salt and pepper to taste
Couscous or rice for serving
Parsley or basil to garnish (optional)
Place onion in food processor and chop.
Heat oil and butter in a large skillet over medium heat. When hot, add the onion and cook for 4 minutes. Then add flour and mushrooms and cook another 5 minutes. Add salt and pepper to the vegetables as they cook.
While that cooks, remove chicken breasts from rotisserie chicken and cut into four pieces.
Add stock, garlic, oregano, Italian seasoning and chicken breasts and increase heat to medium-high. Cook 4 minutes until stock reduces and thickens. Add Marsala and heavy cream and cook 2 minutes. Serve over couscous or rice. If desired, garnish with fresh parsley or basil.
Serve over rice or couscous.
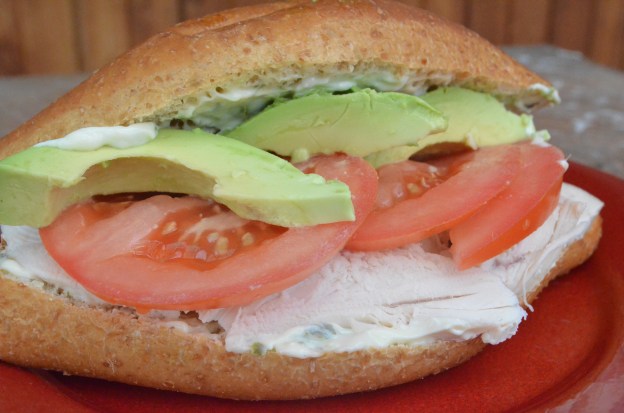
Easy. Easy. Easy. That sums up this sandwich. If you want something quick, but with a flavor kick, try this. I add basil paste to the mayonnaise and then simply add chicken, avocado, tomato and a touch of garlic salt.
Built that on some good bread, and you’re done. This keeps well so it’s a good choice to take on a picnic or to the office for lunch.
California Chicken Sandwich
This easy sandwich gets a big punch of flavor from basil mayonnaise. This sandwich is so easy, delicious and has lots of healthy fat.
Serves 2
Slice of soft Italian bread or French bread
¼ cup mayonnaise
1 1/4 teaspoons basil paste (these are the refrigerated tubes of herbs you see in the store, usually nears herbs or produce)
1 avocado
1 ripe, beefsteak tomato
Dash of garlic salt
1 large rotisserie chicken breast
Mix together mayonnaise and basil paste and set aside. Slice your bread open and if the bread is thick, slightly pick out some of the bread at the bottom or top so you can layer avocado slices in there.
Then spread mayonnaise mixture inside the bread.
Slice avocado, tomato and chicken. Sprinkle garlic salt on the tomatoes. Then layer all three ingredients in the sandwich. Close the bread, cut it in half and share.
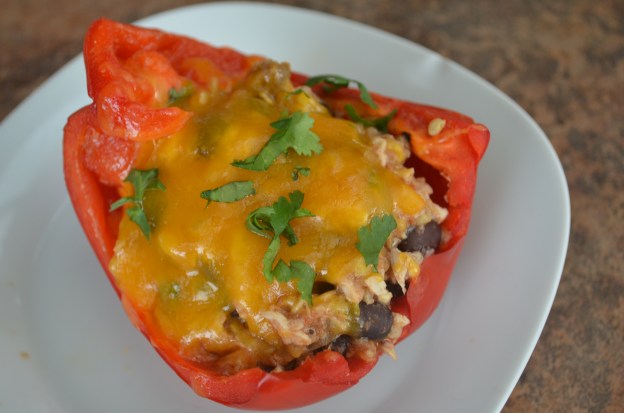
I’ve always loved stuffed peppers, but making one can be quite an affair and take hours. This is one of the easiest versions of stuffed peppers I’ve come up with. Instead of rice, I use hominy and puree it in the food processor. I add bulk, holds the dish together and offers a delicious, deep corn flavor.
Then, I use rotisserie chicken, cumin and picante sauce. Of course, a good dose of cilantro and cheese is wonderful, too.
These peppers are assembled in about 10 minutes and then baked for 15-20. The peppers are still crisp, which I love. I hate mushy vegetables. And vegetables retain more nutrients when they are not cooked too much.
This is a perfect dinner for a busy night. I hope you enjoy it.
Southwest Style Stuffed Peppers
1 can hominy
2 teaspoons cumin seed
1 cup picante sauce
1 rotisserie chicken, chopped and de-skinned
2/3 cup canned black beans, drained
1/3 cup chopped cilantro
2 cups shredded cheddar or Mexi-blend cheese
Garlic salt to taste
4 bell peppers of assorted colors (red and yellow are my favorite)
Preheat oven to 425 degrees.
Drain hominy and place it in the food processor with cumin seed. Pulse until semi-smooth. Then pour in a large bowl. Add picante sauce, chicken, black beans and cilantro. Add 1 cup of cheese. Stir to thoroughly combine the mixture. Set aside.
Cut bell peppers in half and remove seeds and any veins. Stuff each half with the mixture. Then top with remaining cheese.
Cover with aluminum foil and bake 15-20 minutes. Peppers will still be crisp.

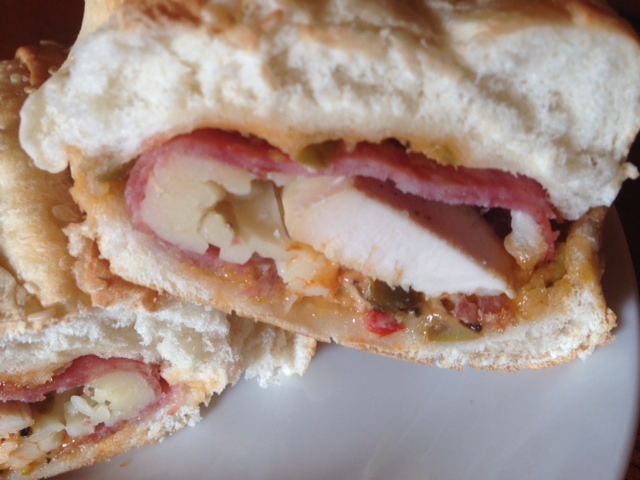
I have never been a huge fan of Muffaletta sandwiches because they are overly salty and taste really fatty. My version of the muffaletta is scrumptious. I omit the ham, add chicken, use the mayo to add a creamy flavor and temper the saltiness of olives. Instead of chopping olives, I simply open a jar of olive tapenade. I prefer green olive tapenade in this recipe.
The chicken adds lean protein to this sandwich and I use less salami than a traditional Muffaletta, so it has less fat. I enjoy this toasted, which makes the bread crusty, cheese gooey and sweats some of the fat off the salami. But you can eat this cold and if you do, it becomes one my “10 minute” recipes. It’s a great, easy sandwich either way. Enjoy.
Ingredients:
3 hoagies or Italian bread sliced into sandwich portions
1/3 cup mayonnaise
¼ cup green olive tapenade
½ cup shredded Manchego cheese (You can substitute Swiss or a Monterey Jack for mild flavor)
1 ¼ cups chopped rotisserie chicken breast, skin removed
Generous dash of Italian seasoning
6 slices large cut salami
Preheat oven to 400 degrees.
Stir together mayonnaise and olive tapenade. Divide the mixture in thirds and spread on the bread. Sprinkle cheese and chicken over hoagies and add a dash of Italian seasoning to each. Top each with two slices of salami.
Bake for 5-7 minutes until cheese melts and bread is toasty. Serve immediately.
Serves 3.

For as far back as I can remember, Easter was special in my family.
I grew up overseas in nine different countries, so our traditions had to be flexible and adapt to what was available locally. For example, one year, we lived in Sudan and we dyed Ostrich eggs and then my mom tied bows around the eggs and used them as centerpiece decorations for the Easter table. That’s one of my favorite Easter memories.
My mother would go all out each year and set a beautiful table; she’d carve grapefruits into baskets and fill them with fruit to start each Easter meal. It was a lot of work, but so beautiful to behold.
A pretty Easter table is a must, in my opinion. It’s spring and flowers are blooming and colors are vibrant, so it doesn’t take much to add some sparkle to your tables. If you need some ideas, here are a few:
Dye Easter eggs and once the eggs are dry, use a glitter pen to write the name of each guest or family member on the egg. Then go to a dollar store and buy candle holders to display the egg and use those as place settings. You can buy candle holders of varying heights for a more dramatic look.
A dollar store is a great place to buy festive ribbon and tie it around a napkin with cutlery. If you’re fortunate enough to have daffodils (or another flower) in your yard, tuck a flower under the ribbon.
Try mason jars filled with candy eggs or jelly beans and chocolate bunnies on top; or mason jars filled with jelly beans and daffodils.
If you have a big Easter celebration and use plastic cutlery, I saw an adorable idea on Pinterest: buy green plastic cutlery, use orange napkins to wrap around the cutlery, and tie it all together with green ribbon, so it looked like a carrot. This is an easy idea and a fun job for kids.
Now, on to the food. In our house, the ham is the centerpiece, but here’s a wonderful side dish to accompany the ham.
My potatoes au gratin are simple to make, there’s no peeling the potatoes. I make them with extra sharp cheddar cheese. If you like cream, cheddar cheese and potatoes, I think you will enjoy these. This dish goes well with beef or lamb, too.
It’s simply layers of thinly sliced potatoes, cooked in heavy cream that is lightly infused with bay leaves and thyme and loaded with cheese. Does that sound heavenly or what?
I hope you enjoy them.
Simple Potatoes Au Gratin with Sharp Cheddar
Serves 6-8
2 tablespoons salted butter
1 1/2 cups heavy whipping cream
2 bay leaves
½ teaspoon thyme leaves
4 large Russet potatoes
2 cups shredded extra sharp cheddar cheese
Salt and pepper
Preheat oven to 375 degrees.
In a heavy bottom pot, add butter, heavy cream, bay leaves and thyme leaves. Heat over medium-low heat. Do not use high heat or your cream will curdle. Bring to a light simmer and stir. Reduce to low.
Wash potatoes and thinly slice them. You want potatoes to be as uniform as possible, so if you have a tool, like a mandolin or cheese grater that has a slicer on it, use those.
Grease a 9-inch deep dish pie pan or baking dish with butter.
Place the first layer of potatoes down and add salt and pepper to the tops. Then sprinkle about 1/3 cup of the cheese over potatoes.
Add the next layer or potatoes being sure to add salt and pepper directly on the potatoes. Add about 1/3 cup of cheese on that layer. Repeat this process until you have four layers. Then pour the cream mixture into the baking dish.
Top with remaining cheddar cheese. Cover with aluminum foil and bake for 50-60 minutes.
Remove foil and bake 5-10 minutes more (test potatoes to be sure they are done. You can insert a toothpick to determine if they are cooked).
Allow to rest 5-10 minutes before slicing.


This dish is packed with protein from three sources: quinoa, chicken and edamame. It’s a light dish and has vitamin C, antioxidants, B vitamins, fiber and more.
.This makes a large batch, so you can enjoy it for several days. It’s so easy to pack for lunch and leftovers are great cold. I actually prefer it cold.
You can use any combination of stir-fried vegetables, like broccoli. I sometimes toss that in if I have takeout leftovers. I personally love ginger, so I’d prefer twice as much ginger, but to tame it for everyone else, I use this amount. If you love ginger, you can add more, too.

Asian Chicken Quinoa Salad
This serves 6
2 cups white quinoa
4 cups chicken broth
½ teaspoon ginger paste
1 bunch green onions
2 cups shelled edamame (microwave is most convenient)
1 tablespoon canola oil
1 (7.75-ounce) bag of tri-colored cole slaw mix
1 red bell pepper
1 teaspoon soy sauce
Black pepper, to taste
1/2 bunch fresh cilantro
Meat from one rotisserie chicken
Dressing:
4 tablespoons canola oil
2 teaspoon soy sauce
2 tablespoon rice wine vinegar
4 teaspoons sesame oil
4 teaspoons sugar
½ teaspoon ginger paste
For the dressing: whisk all ingredients together and set aside.
For the quinoa, in a medium to large pot with a tight fitting lid, bring broth, ginger paste and quinoa to a boil for 3 minutes, then cover and reduce heat to low for 15 minutes. You will know quinoa is done when the grain releases what looks like a little hook. If it’s not done after 15 minutes, cover and cook another 5.
While that cooks, slice roots off green onions and thinly slice the rest of the onions and set aside. Chop red bell pepper and set aside.
Cook edamame according to package directions.
Grab your bundle of cilantro and chop the leaves.
Next, in a large frying pan, heat canola oil over medium-high heat. When hot, add onion and cole slaw mix and cook 7 minutes. Add red bell pepper and stir fry 3 minutes. Then add soy sauce and pepper to taste.
Debone and de-skin your chicken and chop it into small cubes.
By now, quinoa should be done.
Transfer it to a large bowl. Add edamame, cabbage mixture, cilantro and chopped chicken. Toss with the dressing and serve.

I am still taking a break from my rotisserie chicken recipes to offer up some Easter dishes. Easter is one of my favorite holidays.
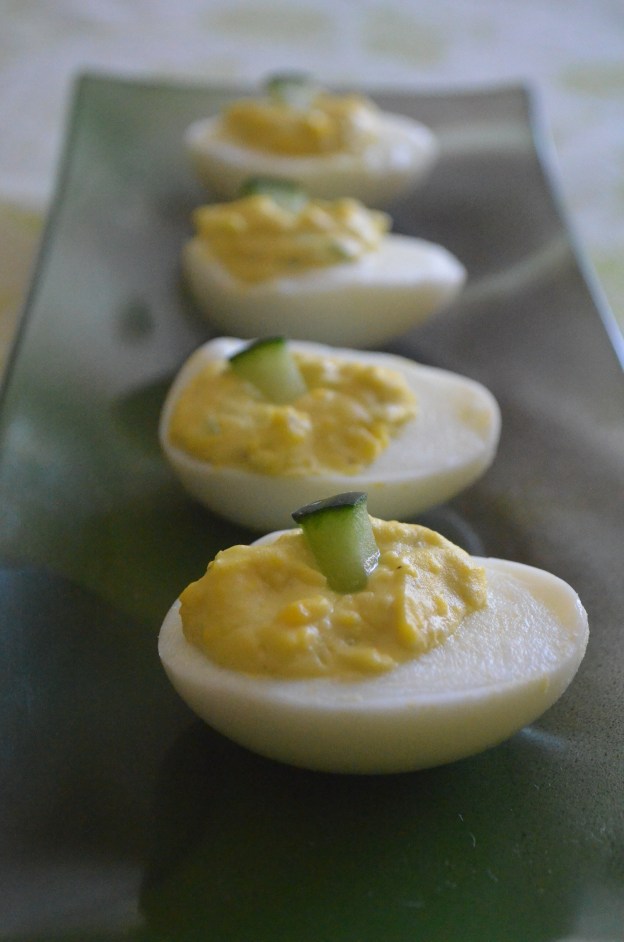
Easter would not feel like Easter without deviled eggs. My Wasabi and Cucumber Deviled Eggs are delicious and refreshing. There’s enough wasabi to taste it, but not enough to make your nostrils flare.
Whenever I cook for company, I try to find the middle of the road in terms of flavors. You can add more if you love wasabi or know your guests won’t mind extra heat. I am actually pretty traditional when it comes to deviled eggs, but I love these. It’s a slight twist on a classic.
Whenever I make hard boiled eggs, I always boil two or three extra because there’s always one or two eggs that is deformed or rips when you’re peeling it, so extras are essential. My recipe calls for six, so boil eight or nine. If you’re fortunate enough that they all work out, you can fill extra egg whites with deviled egg mix because there is always leftover yolk mix once everything has been mixed in.
Wasabi and Cucumber Deviled Eggs
Serves 4-6 *6 large eggs
2 tablespoons finely minced cucumber (be sure it’s minced fine)
3 tablespoons Miracle Whip
1 tablespoon Woeber’s Sandwich Pal Wasabi Sauce, plus ½ teaspoon
Salt and pepper to taste
If you have a favorite boiling method, use it. If not, follow mine.
To boil the eggs: Place eggs in a large pot so they are in a single layer and fill with water that rises 2 inches above eggs. Put on the stove and bring to a boil. When it reaches a boil, boil for 5 minutes. Cover the pot with a lid and turn off the heat. Let rest 15 minutes. Drain water off and then scoop ice over eggs to cool.
When cool, peel eggs and slice in half horizontally. Remove yolks and place in a bowl.
Mash yolks with a fork and then add cucumber, Miracle Whip, wasabi sauce and salt and pepper to taste. Mix until well combined and mostly smooth. Refill egg whites with this mixture and cover and refrigerate until time to serve.

Pasta is one dish I never order in a restaurant because it’s so easy and inexpensive to make at home. Like this Chicken Alfredo. The most time consuming part of this dish is cooking the pasta. I make mine with angel hair because the sauce sticks to the noodles more.
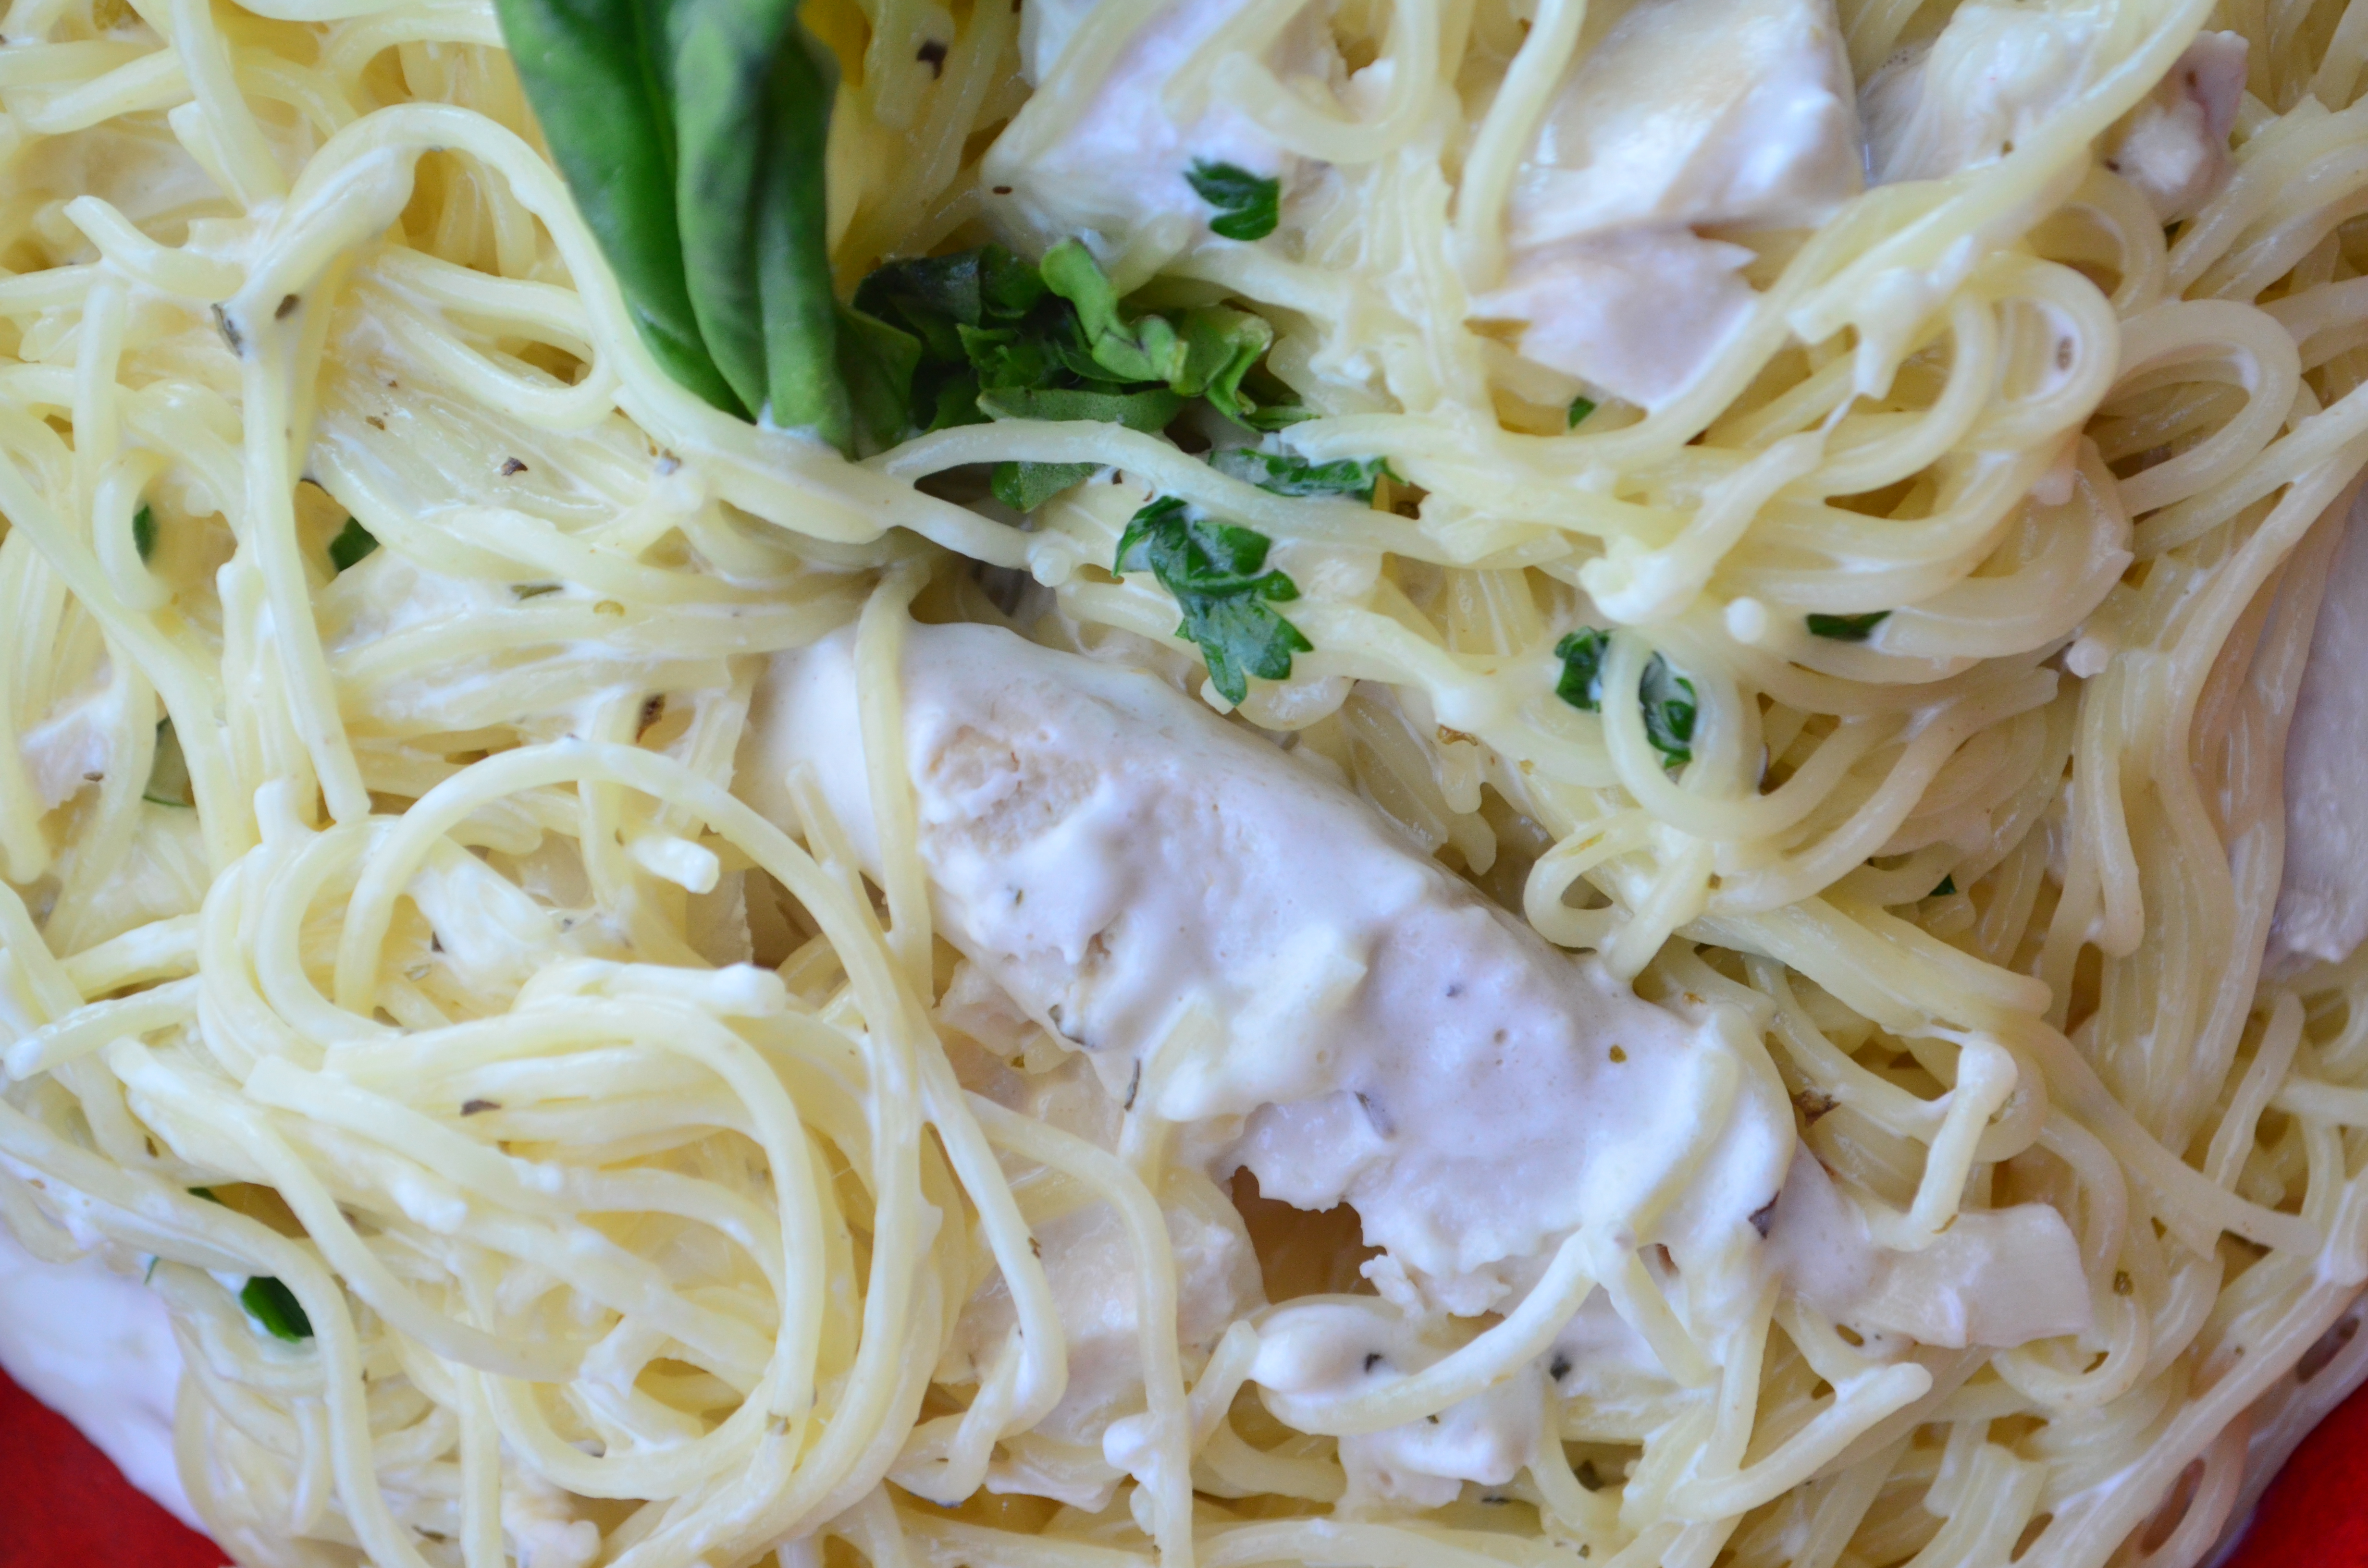
Chicken Alfredo
Serves 4
Both breasts from rotisserie chicken
8 ounces angel hair pasta
¼ cup butter
1 garlic clove
1 1/2 cups heavy whipping cream
1 1/2 cusp fresh Parmesan cheese
2 tablespoons chopped fresh flat leaf parsley
2 tablespoons fresh basil
Salt and pepper to taste
Fresh chives (optional)
I use chives because we have them in our garden. It’s not worth buying chives for this dish, so the chives are optional. Also, I love basil in alfredo but you can skip it if you’re not crazy about basil.
Do not salt your sauce until the end because there is a lot of salt in cheese.
This dish comes together quickly at the end, so have everything prepped.
First, put water on to boil for pasta.
Then remove the chicken breasts and the skin and chop chicken into chunks and set aside.
Slice basil and chop parsley.
When water is ready, add the pasta
Cook pasta according to aldente directions on the box, strain and set aside.
In a large skillet , heat butter and garlic for 1 minute. Add heavy cream and cook over medium heat for 5 minutes, stirring constantly. Add Parmesan, chicken, pasta, parsley and basil. Cook 2 minutes until sauce sticks to pasta. Garnish with fresh basil and chives, if desired. Serve immediately.
This photo does not do this dish justice. Just know it’s delicious!

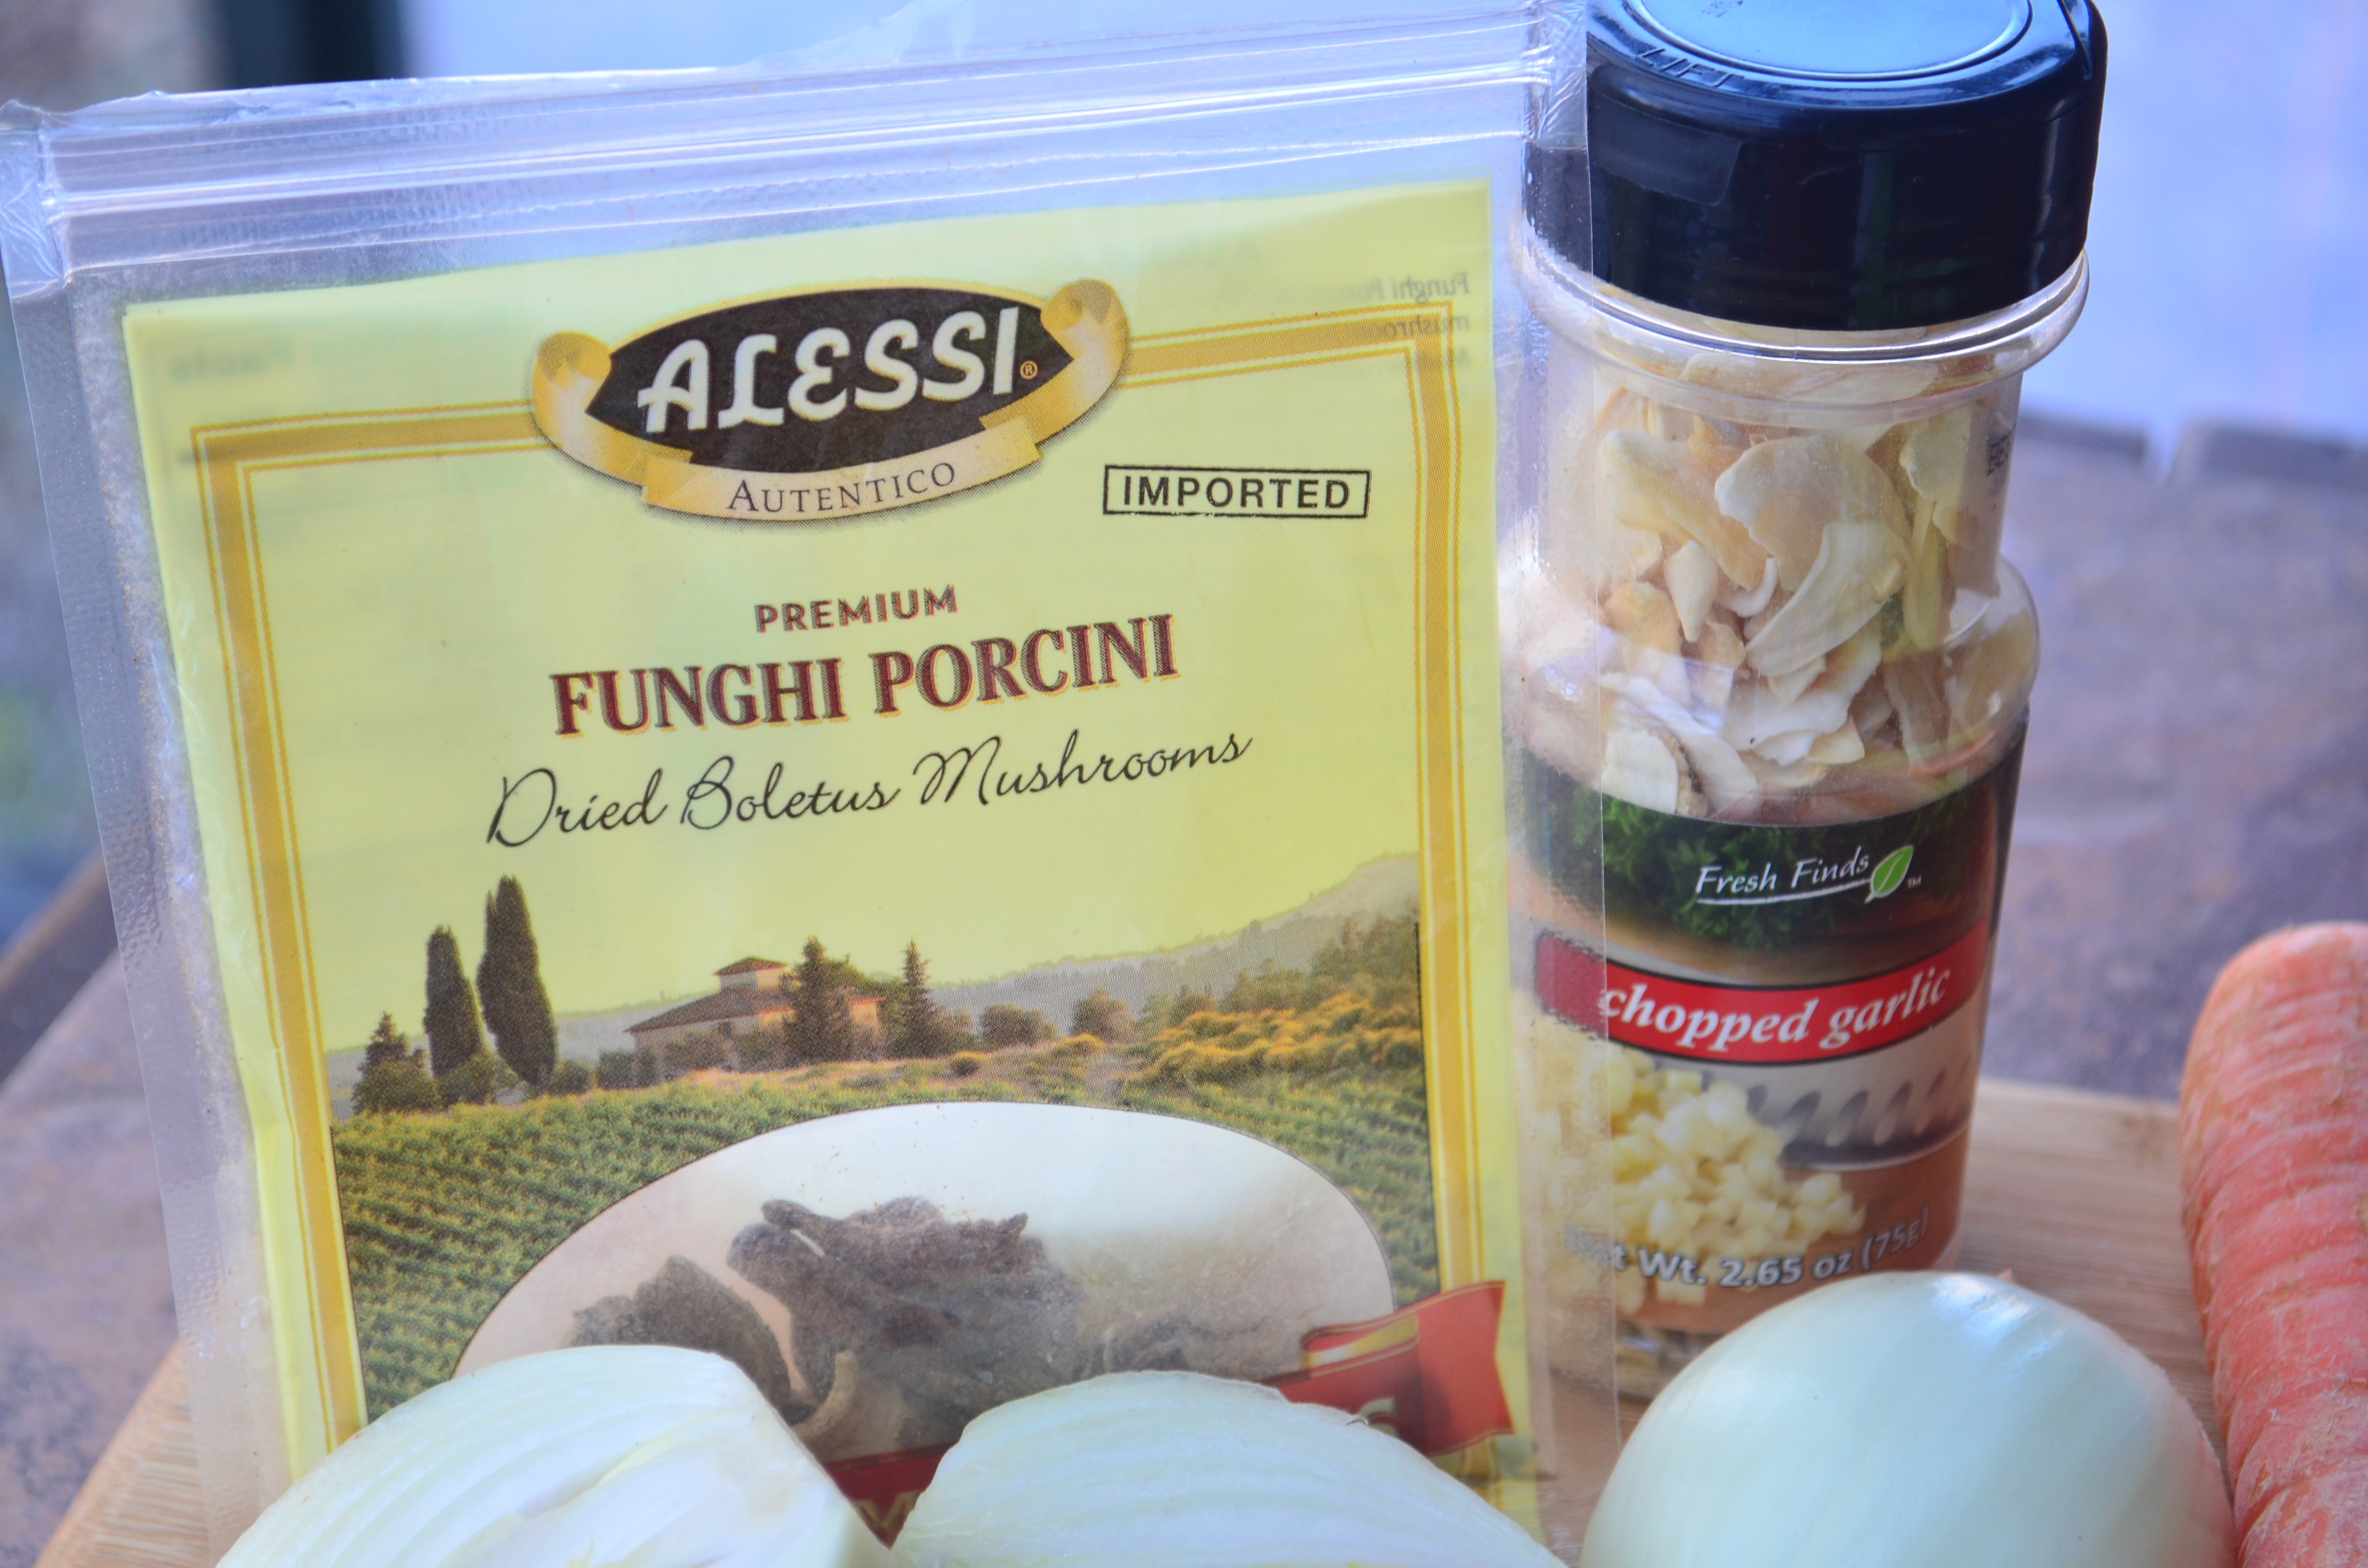
I’ve experimented a lot with slow cooker stock. My first batch, tasted like watered down stock. Not good. The next was a little better, but still not good enough.
I make a ton of traditional stock, but the problem with a slow cooker is it doesn’t maintain that simmer all day, like the stove does, to extract the flavor needed for a stock. So I realized I needed to add a punch of flavor in the ingredients. After many attempts, I have finally come up with this recipe which uses two chicken carcasses, parsley, dried mushrooms (which are key), and a hint of soy sauce. The result is a beautiful, dark, rich stock. It’s darker than traditional chicken stock and almost looks like beef stock.
This stock is particularly good in my vegetable, barley soup; chicken noodle soups; Asian soups; mushroom soup; potpie; rice dishes; sauces, etc.
This will yield 7-8 cups of stock, so you probably want to freeze extra.
If you are single and don’t buy two chickens at a time, just freeze a carcass when you’re done with one and the next time you buy one, make this stock.
When making this stock, it’s important that you use the chicken skin, too. I never eat the skin because it’s so unhealthy, but it’s loaded with fat and seasoned, which adds flavor to your stock.
I also love how easy this is. I don’t have to monitor it like I do a stovetop stock. I toss it in and forget about it.
If you have to go buy all these ingredients, then this will be more expensive than store-bought stock, and not really worth it. But I always have all these ingredients on hand, so I make homemade stock all the time. I prefer the flavor and it has less sodium than commercial brands. If you are watching your sodium level, skip the soy sauce in this recipe. Plus, I freeze it so I can grab stock whenever I need.
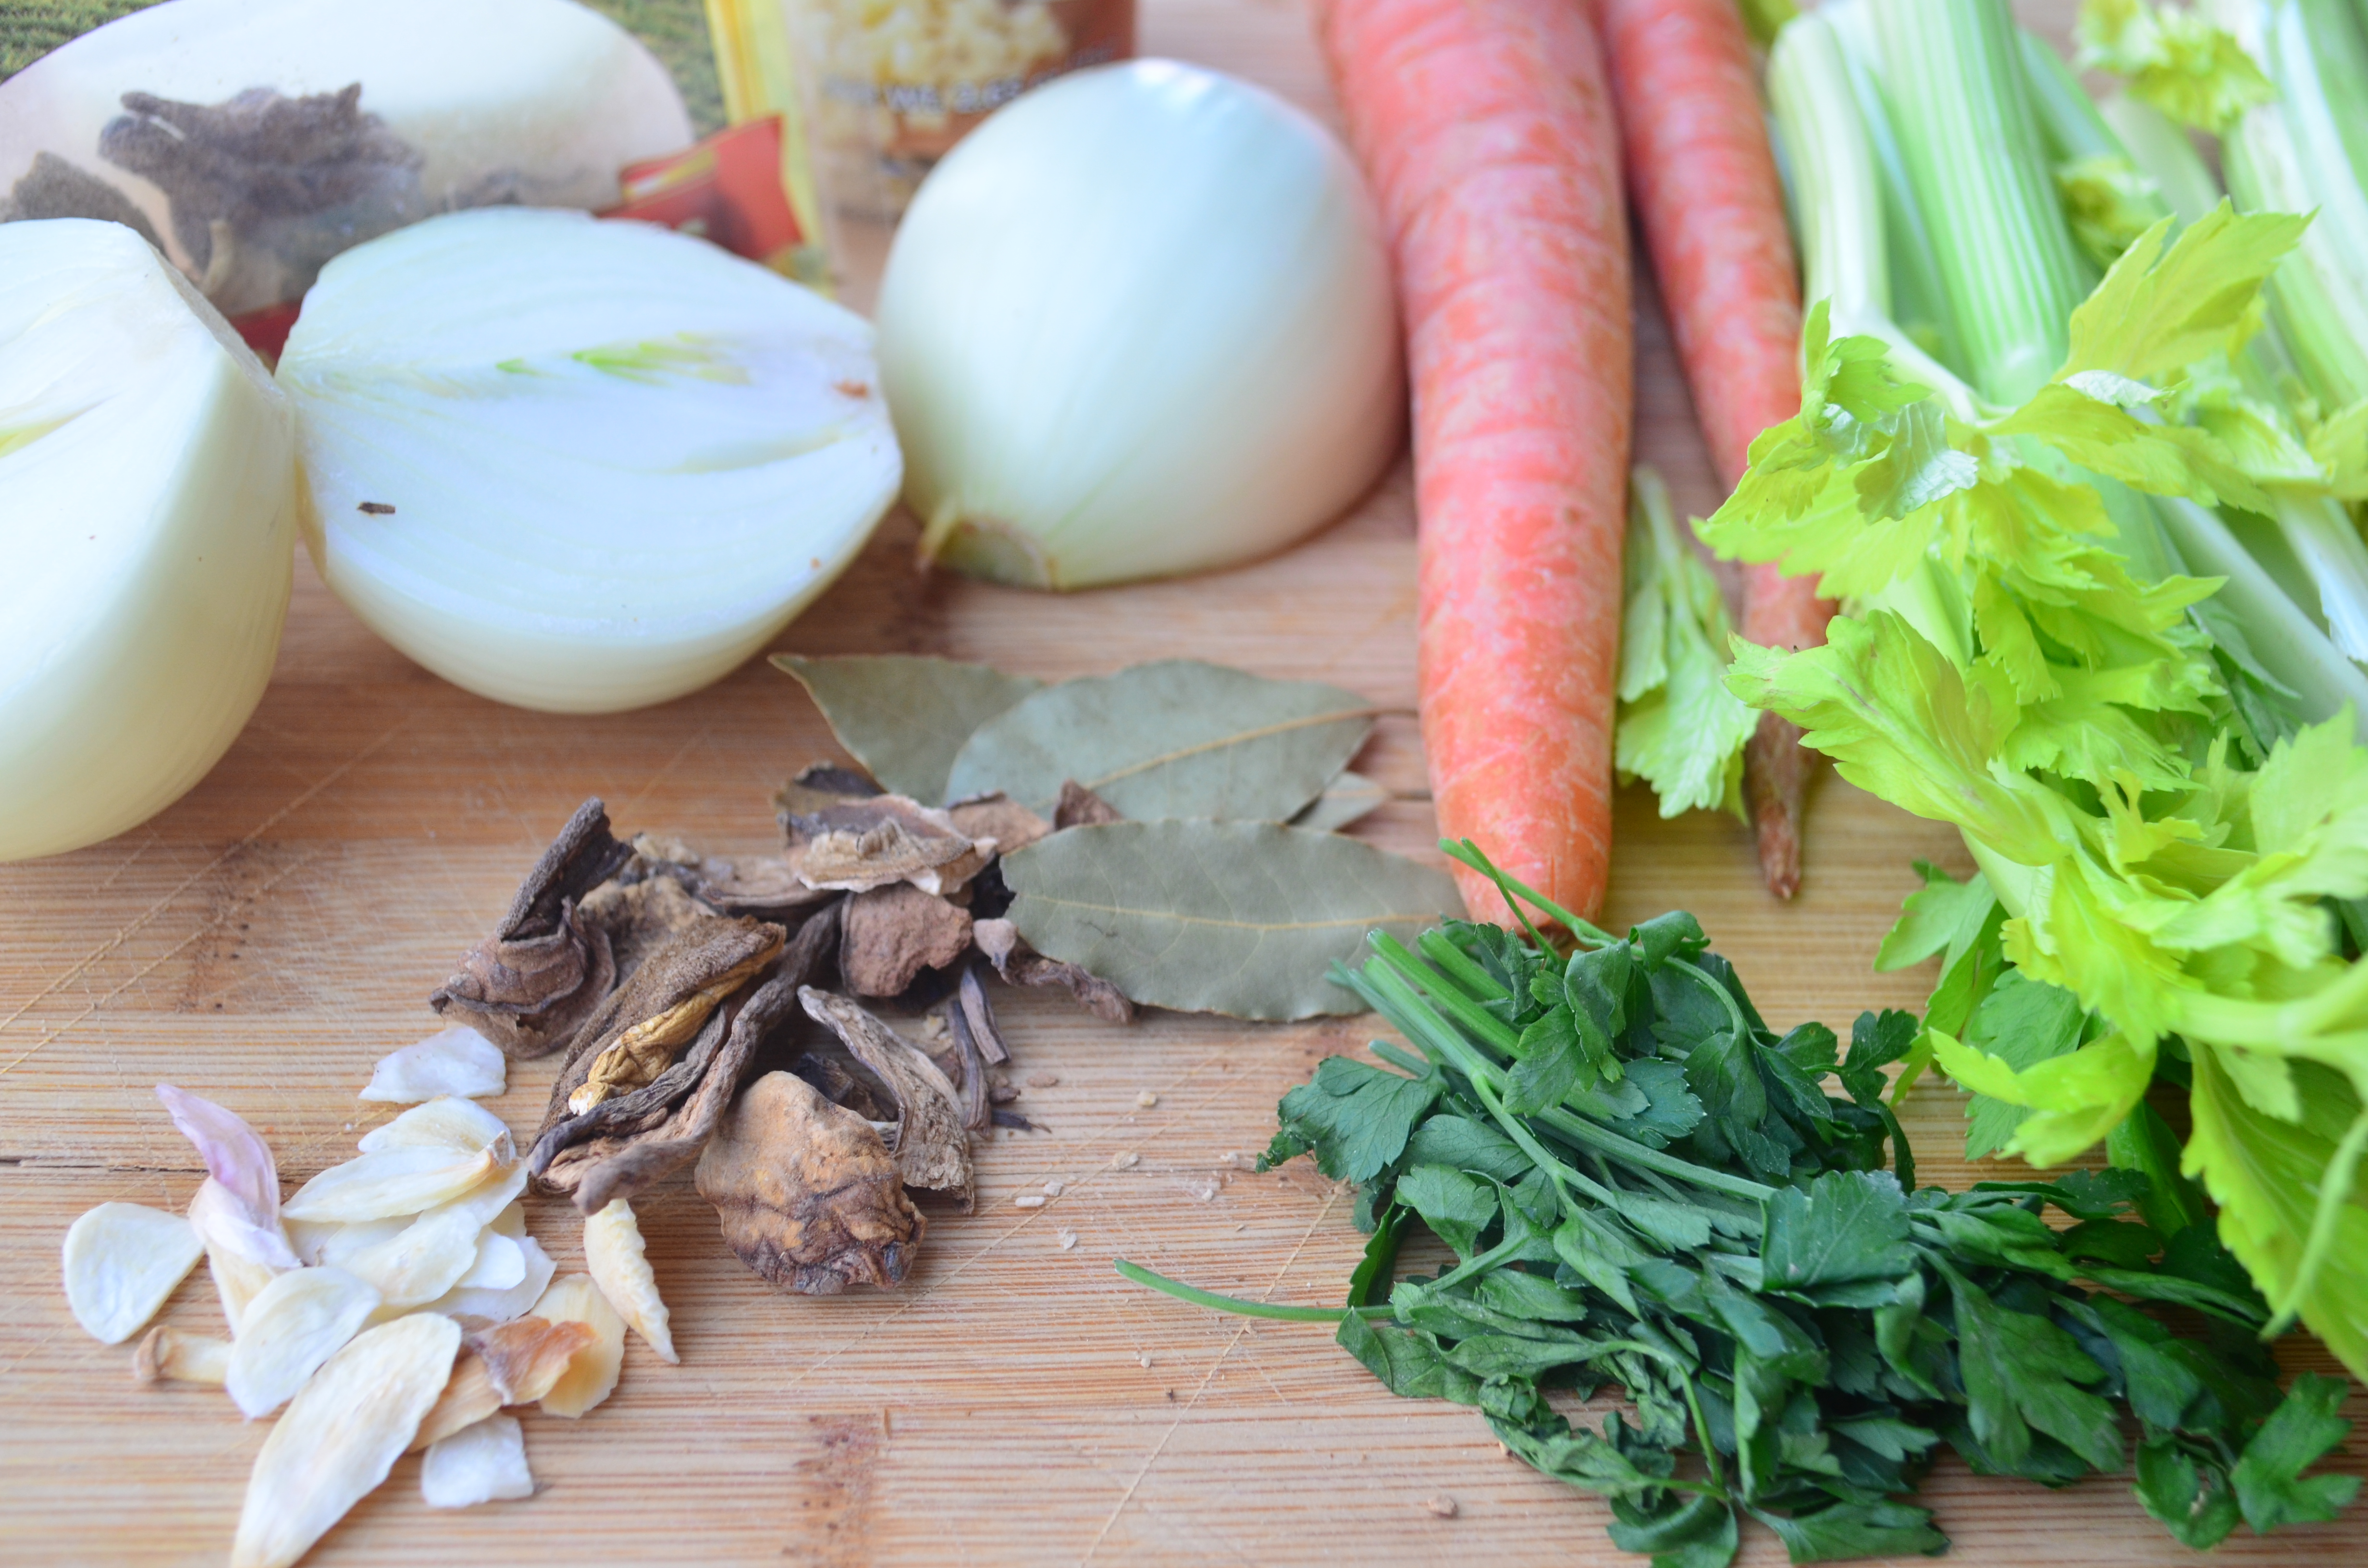
Slow Cooker Stock
8 cups water
2 rotisserie chicken carcasses
1 teaspoon peppercorns
3 bay leaves
2 carrots
1 large onion
4 stalks of celery with the leaves
1 clove chopped garlic or 1 teaspoon dehydrated garlic
3 tablespoons dried porcini mushrooms or another dried mushroom, like shiitake
½ teaspoon soy sauce
¼ cup fresh parsley with stems (optional)
Directions
Place all ingredients in large slow cooker. Cover and cook on high for 6-8 hours. Note, if you have a slow cooker that cook in hours instead of heat, 4 hours, 6 hours, 10 hours—then if possible, cook it on 4 hours and then when it’s done, hit 4 hours again. This will be the highest possible temperature, which will yield the best results.
